Wednesday, June 29, 2016

Crocheted Flip Flops!


My niece, Emily, wearing her flip flops and getting ready
to go shopping with her purse!

Aren’t these just the cutest little baby flip flops?! If you are anything like my husband, you’d say, “They don’t offer any support whatsoever,” or “She can’t even walk yet!” 


But, I think quite differently than my husband (at least when it comes to crochet projects!) So, when I found this pattern, I just knew I had to try it for my niece, Emily. She was almost one year old at the time. 


Working hard on putting her flip flops on (and taking them off again!)

I bought a cute outfit for her in some turquoise/purplish colors and I wanted the shoes to match, so I decided to go with a light and dark purple flip flop. 


Turquoise version


The pattern includes both the pattern for the shoe and the flower. Here is the free pattern I used: http://melodyscrochetitems-melody88.blogspot.co.nz/2011/05/crochet-baby-slipper-pattern.html


Pretty simple! I made two soles for each show to make it a little bit thicker. Then, I decorated them with a tiny flower. Sooooo easy and soooooo adorable.


I used a 4.25mm crochet hook and "I Love this Yarn" from Hobby Lobby. They have so many colors to choose from!


I made another pair for a friend of mine who recently had a baby girl. They make a perfect girl gift and are cheap to make because they use such a small amount of yarn. 


Ready to roll!


Monday, June 20, 2016

Chevron Baby Blanket in Gradient Colors

Adorable Evelyn Elaine about a week old. 

I met my dear friend, Lindzee, when she moved to North Dakota a few years ago. We hit it off pretty quickly. Both of us have a love for kids (that’s where we met – working at the YMCA Early Learning Center). I was the lead teacher in the infant room and she was the lead teacher in the younger preschool room. 

Lindzee and I are both pretty geeky. We both have an adventurous spirit. My husband, Jon, and I got Lindzee hooked on one of our hobbies: geocaching. We have spent many hours together on geocaching road trips. We’ve trudged through snow, gotten lost in the woods (Ok, maybe not COMPLETELY lost – we do have GPS devices on us!), gone camping together, pulled ticks off each other, and even ended up in the ditch together on an icy winter day. Lindzee was always up for something fun. She even joined my Mom and I for a 5K Run or Dye event. 

Lindzee, me, and my Mom after our Run or Dye event. ;)

Sadly, Lindzee didn’t really care for the North Dakota winters and decided to move back to South Carolina last year. I miss her dearly. She is one of the most caring, lovable, spirited, generous people I have ever and will ever meet.

My husband snow blowing our back yard. I don't know why you wouldn't like these North Dakota winters!? 

Now, Lindzee is married to a wonderful man, Brandon. He is a lucky guy. Brandon and Lindzee just had their first baby – a GIRL! Baby Evelyn made her grand entrance into the world at 6:19 a.m. on June 11th weighing 7 lbs 9 oz and measuring 20 ¼”. Can’t wait to meet her! I couldn’t be more excited for them.


The whole happy family!
Sweet baby Evelyn 


 Of course, after hearing that she was expecting a girl, I HAD to crochet something for her. Anyone who knows me knows that crocheting something handmade is a way I show love for people around me. Especially when it involves a baby!
J 

Lindzee looking stunningly beautiful for just having a baby!

I have long wanted to do a blanket in one color scheme with a color gradient theme. I wandered around JoAnn Fabrics for a few hours looking at their yarn aisles and trying to decide what color scheme to go with. 

My twin sister, Elisa, was a great help to me. She is an artist and has an eye for color schemes. I was texting her pictures left and right. She helped me narrow it down to a few choices. I went with purple. A perfect baby girl color. After pacing the aisles and checking out every shade of purple yarn I could find, I decided on 4 different shades and a white for contrast. 


The yarn colors I went with include: Big Twist in color White (371 yds), CARON Simply Soft in color Lilac (812 yds), Red Heart with Love color in Lilac (370 yds), Big Twist in color Blueberry (371 yds), and Big Twist in color Damson Purple (371 yds). I needed only one skein of each (what is pictured) to do this blanket. Using coupons, it cost me around $16. 

Here is the link to the free pattern:  http://daisycottagedesigns.net/crochet/ripple-blanket-crochet-pattern/


I have done several chevron patterns before, but not this one. This one is super simple – once you figure out the pattern, you just do the same thing over and over! 

The only thing you have to decide is when to switch to a different color. I decided to do two rows of each color before moving on to the next color. To switch to the next color, drop the current color and yarn over with the new color when you are pulling through the last stitch of the row. 

Starting to work on row 1. You can see the chevron pattern already!


The entire blanket is done in double crochet stitches, some increasing and some decreasing. There are always 4 double crochets in-between the increasing and decreasing stitches. Super duper easy! 


You could decide to repeat the light and dark rows like I did or just do one row of each. When you reach your desired length, and are at a good cut-off point, tie off the yarn. I ended up with 80 rows. 


Two rows of white stitches and two rows of light purple stitches completed.

I must say, I love the color combo and the chevron pattern together. And, since I bought SO much yarn (not knowing how much I’d need and wanting to make sure I had enough of each color), I have enough of the different purple colors to make another blanket….look for another blog post down the road. ;)
Two rows of each of the colors completed.


If you are anything like me, you like to snack while you crochet.  I made some delicious bruschetta bites and swallowed them down with some even more delicious blackberry merlot. Isn’t crocheting fun?! 
Cuddled up with an electric blanket, bruschetta, and wine. My favorite way to crochet. :) 

The finished product (minus tying in loose ends). Total of 80 rows (remember each skinny stripe is 2 rows).


So, I decided to repeat two rows of the white and the darkest purple but you could do just two rows of each color so the stripes are all the same thickness. 


Can't wait to see Evelyn in the hat that I 
gave away in an earlier blog post.


Matching hats for Lindzee and her baby girl!


Isn't she absolutely precious?!
 I just want to snuggle her!


Since I had an extra skein of each color left, I played around with another color gradient pattern. I'll post about that blanket in a couple months. :)


Saturday, May 21, 2016

joefitness & Superman


Five years ago, I was training for a marathon. I was in pretty good shape and although I wasn’t a super fast runner, I completed the entire 26.2 miles and was pretty pumped about it. Then, the following year, I started training for another marathon and ended up with a stress fracture in my hip. That ended my running. 


  After being misdiagnosed and sent to physical therapy (only to have it make things worse), I was finally properly diagnosed and given crutches for a month. After recovering from the stress fracture, I was scared to run again and didn’t really do much of anything physical. In the following couple of years, I gained weight and felt sluggish and was not happy with what I saw in the mirror. I decided I needed to do something about that. 

A picture of me about the time I started at joefitness.
I was meeting up with my Uncle Willie.
Definitely the worst shape I've been in.


About a year ago, I started a new fitness journey. I saw on facebook that joefitness lets you try out their gym for 2 weeks FREE. I decided to be brave and sign up for my 2 free weeks. I met Joe, owner at joefitness, and he showed me the ropes those first few weeks. 


Not going to lie, it kicked my ass. Damn, was I sore those first few weeks. I was working muscles I never knew I had. Joe was great at modifying exercises if I couldn’t do it at first. His wife, Jill, was super welcoming me as well. They both go out of their way to get to know each and every gym member. They know every single one of us by name. 

Oh, if those medicine balls could talk. I might have sworn at them a time or two. I have also caught them with my face.

I love that when I go there, I KNOW I’m going to get a solid workout in. All of the classes (bootcamp, strength, kickboxing and challenge class) are only half an hour long but you are guaranteed to be a hot sweaty mess when you leave.  Joe and Jill set up the class so that the exercises are challenging but possible. I started off lifting 15 pound weights and am already up to 30 and 35 pounds. I have gained a ton of muscles and my clothes fit better! I was getting discouraged when I saw that I wasn’t losing a lot of weight, but I realized that I was gaining muscle mass. Now, I try to focus on how much better I feel, how my clothes fit, and how much stronger I am getting at the gym.

"Joefitness" and "results" - two words that belong in the same sentence!


Look at those Swiss balls and free weights
begging to be picked up (and put back down!)


Joe and Jill actually care about their gym members – they routinely ask us about our goals, encourage us to take that next step in our fitness journey, and help support healthy nutritious food options. 

I love that I don’t have to think about putting together an awesome fitness routine – I just go to joefitness and do the workout. Just when my body is starting to get used to a specific exercise or routine, Joe changes things up. I’ve never had the same workout twice. He pushes me harder than I would ever push myself. I would normally go to the gym, hop on a bike and barely sweat for half an hour and call it good. Not anymore!


Wearing my joefitness tank top and sweating up a storm doing some Russian press-ups. Up to 35 pounds on those bad boys! 

Sewing the eyes on to the head.


One thing you’ll notice about Joe is that he loves Superman. He has a Superman clock, Superman mug, Superman tee-shirts, pretty much anything Superman. Jill and Joe’s little guy, Jackson, just turned one about a month ago. Guess what the theme of the party was? Superman, of course! 


To celebrate Joe’s birthday (and my first year anniversary of working out at joefitness!) I decided to crochet a little Superman for Joe’s desk. I found an adorable pattern online at Etsy. 


Here is the link to the gal’s Etsy shop. https://www.etsy.com/listing/164165932/superman-amigurumi-crochet-doll-pattern?ga_search_query=superman+pattern&ref=shop_items_search_1 Great buy and she was super nice to work with. I found the embroidered Superman logo at Hobby Lobby. Although it was a bit bigger than I wanted, it was the only one I found. I glued it on and then also did some light stitching around the border with thread. 

I love that Superman can stand! It takes a little bit of work, but he can do it!

I didn’t take a ton of photos while I was making the mini Superman since I bought the pattern and don’t have the rights to share it. But, here is the finished product!


I can’t say enough about how awesome this last year’s journey has been and I look forward to growing stronger and feeling even better this coming year. Here's to more burpees, wall balls, the ski erg machine, ski hops, lunges, squat thrusters, Russian twists, single leg dead lifts,  push-ups, joefitness sit-ups, and the list goes on and on.....
The dreaded ski erg machine. :)

Just remember: It doesn't get easier, you get stronger!


Sunday, May 15, 2016

Mother's Day


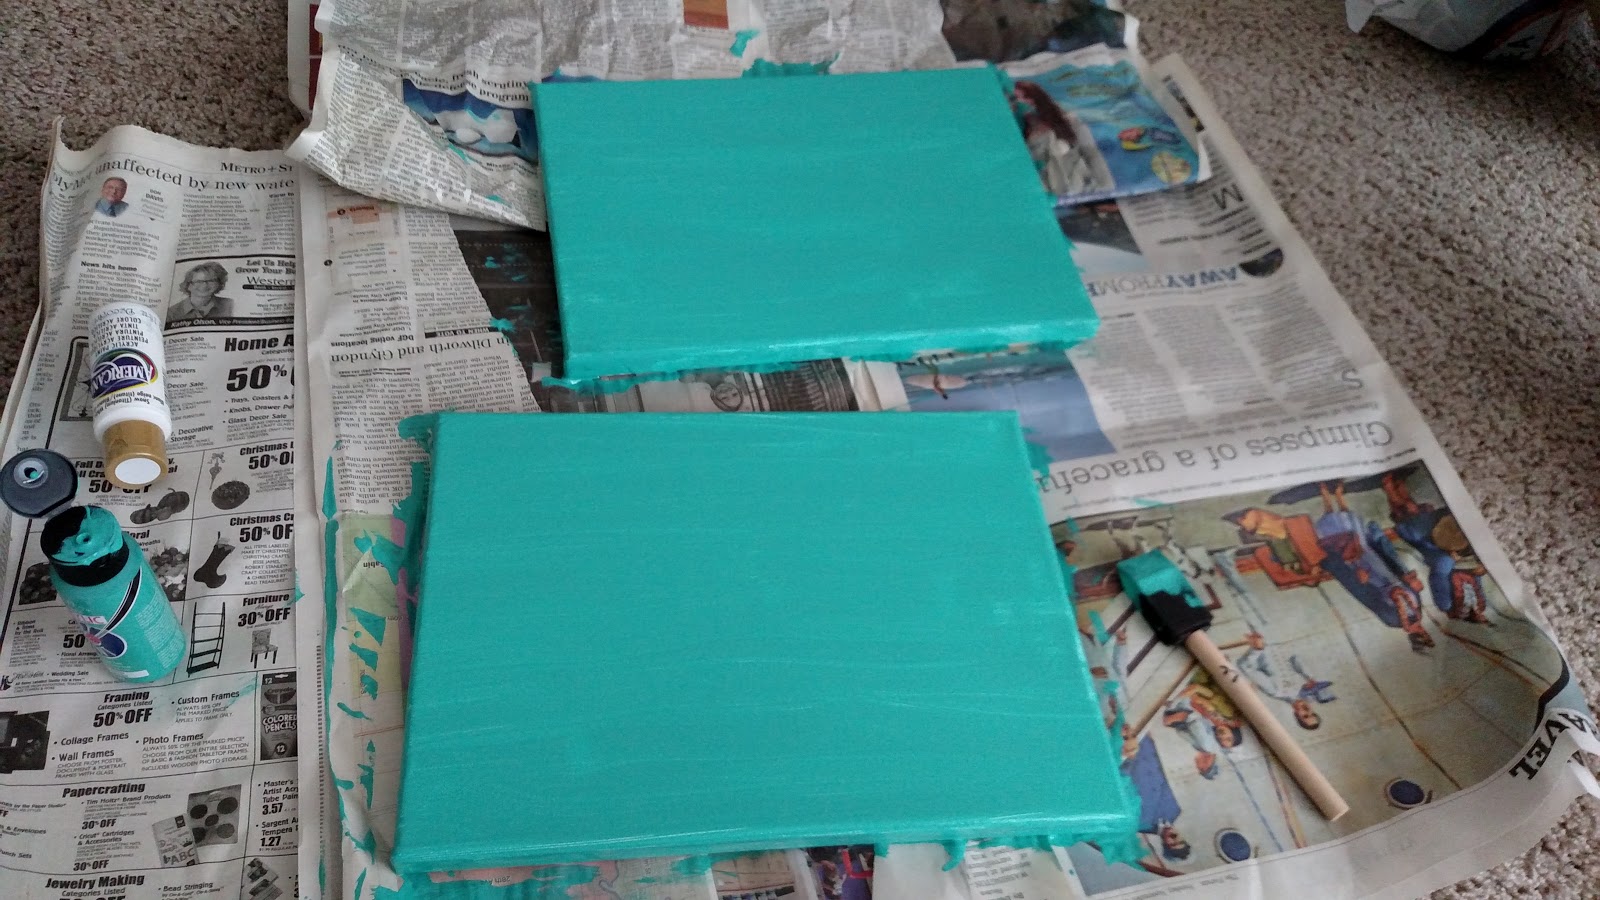
Last weekend, it was Mother's day! If you are looking for a cute keepsake for Mom, here is a great, easy, relatively cheap project to do. I bought a 2-pack of thick 9x12 canvases from Hobby Lobby (woo hoo for 40% off coupons!). Pick a couple of colors of acrylic paint and buy one tube of each. I picked out a bright turquoise color for the background and white for the hand and footprints.  Overall, the entire project cost less than $10 and I’ll have two super cute gifts made by Sydney to give to her Mom and Grandma. The overall idea is to paint the word “Love” on the canvas with a hand print being the letter “o” and two footprints making the letter “v.”

Canvas, foam paint brush, and two tubes of acrylic paint

First step, prep your area with some newspapers or old magazines. I did a coat of turquoise paint on both canvases, including the sides. The first coat ends up being a little streaky looking, but that’s OK because you’ll go over it again with a second coat and that will even things out.


Give it an hour or so to dry completely and then give it another coat of paint. Keep in mind this is acrylic paint and is PERMANENT. Make sure you wash your hands right away afterwards with soap and water to remove any paint from your hands. Wear old clothes so you don’t have to worry about staining anything.


After the first coat of paint


The next step is a little tricky. You’ll need at least two people to tackle this job. I recruited Sydney’s super awesome child care providers. I also brought an old washrag to wash Sydney’s hands and feet.

With the white paint and a small paintbrush, paint one of the child’s hands and carefully make a hand print where the “o” in the word “Love” will be on your canvas. If you are making multiples canvases (like I am), do the other hand print right away since you already have the child’s hand messy! You will have to add more paint before doing the second print. Have one person hold onto the child’s wrist to prevent any hand flailing and paint flying. Hopefully, you’ll get a nice spread out hand print with the fingers clearly visible. Some younger children might have more of a blob looking print because they like to put their fingers into little fists.

After washing up the child’s hand, then it’s time to tackle the feet. Take off socks and shoes, roll up the child’s pants (or take them off completely) and have one person hold the child’s ankle still while the other person gently paints the child’s foot with white paint. Both teachers can help lift up the child and place the child’s footprint on the canvas. Then, do the other footprint to complete the letter “v.”

Painting the "L" and "e" on after the prints dried

Let both of these completely dry before tackling the “L” and “e.” I like to wait to do those two letters last in case the hand or footprints go crazy and end up not quite where you want them. With a thin brush, paint the “L” and “e” onto the canvas and let dry. You’re done! If you’d like, you can put the child’s name and year on the front (but at the very least, put it on the back) so you can remember when your child’s hand and feet were that small. 

Finished product! 


Thursday, May 5, 2016

Teacher appreciation day

The best popcorn on the planet: Mallow Magic by Jolly Time!


It’s Teacher Appreciation Week – parents, thank your teachers! That means child care providers, too! Remember, they are also teachers! Child care providers put so much love, time, energy, and passion into their jobs and are WAY underpaid. Make sure you let them know you appreciate all they do. My niece, Sydney, just loves her teachers. It's wonderful knowing my niece is in good hands. That kind of peace of mind is priceless.


I hit up Pinterest for some ideas of how I could thank Sydney’s teachers. I decided to do a popcorn bar with some treats/goodies. I bought two different types of popcorn – regular butter and marshmallow (my favorite!). I got the cute printable popcorn shapes from this website: http://everydaydishes.com/holiday/diy-popcorn-bar-recipe/


For those of you who haven’t tried this super awesome marshmallow popcorn, you HAVE to. It’s not easy to find – Walmart didn’t have it but my local Hornbachers grocery store carries it. Jolly Time Mallow Magic is AMAZING!

It’s basically popcorn that comes with a little pouch of marshmallow gooey goodness that you pour over the top.


In addition, I bought a variety of different candy (some fruity, some chocolatey) to put on top of the popcorn. I bought orchard Skittles, Whopper malt balls, Junior mints, marshmallows, gummy bears, and peanut M&M’s.


I put the popcorn in some paper bags and the candy in some plastic cups. I also brought lunch size paper bags so teachers could scoop popcorn and candy into the individual bags. This is just one of many different ways you can show the teachers in your lives that you appreciate them!


Some yummy popcorn and sweet treats for some super sweet gals! 


Monday, April 25, 2016

Cowl with matching hat

My beautiful twin sister, Elisa, wearing her cowl.


I love working with thicker yarn. I love big funky buttons. I love neutral colors that go with EVERYTHING. I’m a sucker for a cute crocheted cowl pattern. Because of all of those reasons, I fell in love with this FREE cowl pattern.


Elisa wearing the cowl in Oatmeal.


I used Lion brand Wool Ease Quick and Thick in Oatmeal (I’ve also done one in a light grey color). This yarn comes in some super fun colors, but I decided on a more neutral color so that it would go with pretty much any outfit. Because of the nature of this pattern, it is very flexible and self-adjusting. It basically is a big rectangle with a large decorative (yet functional) button sewed on in one corner.

I used a 9mm crochet hook and around 1 ½ skeins of yarn. The pattern consists entirely of single crochet, double crochet, and chaining. Super easy and is a nice looking chunky pattern. The holes in the cowl mean it is versatile when putting in on because the large button will fit in any of those holes. It took me a couple of hours to crochet the cowl (did I mention I love working with thick yarn?!)


I made this as a gift for my twin sister and when I brought it into work to show my co-workers, my friend Mari loved it so much she asked me to make one for her daughter.


The matching cowl and hat set made with Grey Marble.


Because it works up so fast, I decided to make a cowl and hat set to donate to a silent auction for United Way. I used a simple hat pattern that I found on Ravelry. Here is the link: http://www.ravelry.com/patterns/library/hubbys-chunky-hat


I wanted a hat pattern that also used a 9mm crochet hook so that I could use the exact same yarn as the cowl to make it a complete set.


Because of the design of the cowl, the button can be
pulled through any of the many holes.


After completing the cowl, determine the best placement for your button by trying it on first. I put my button at least 3 rows in and 3 rows up from the corner. 


To wear the cowl, you simply fold over the top by a couple of inches and then secure with the button wherever it looks and feels the best.