Showing posts with label fall weather accessories. Show all posts

Friday, November 4, 2016

Non-slip toddler slippers


My niece, Sydney, loves to go out on our deck to see if the neighbor puppies are out in the yard, playing. She also is a great helper and likes to assist us in taking the garbage out.

Since it’s been getting a little cooler out, we needed to come up with a solution so Sydney’s toes don't get cold. I should preface this with the fact that Sydney hates socks. Despises them. They come off instantly. So, most of the time, when she joins us outside, she is barefoot. Well, in North Dakota, that only works for a short period of time in the summer.

Now that it is fall, it’s getting too chilly for her to be without socks. My husband suggested I make her some slippers that we can quickly slip on her feet. That way, we don’t have to hunt for socks and shoes every time.
After searching for a toddler slipper pattern, I stumbled across this super cute one on Pinterest. I have SO many good crochet patterns on my Pinterest board - check it out if you are looking for more patterns!

They are so adorable and they can be tightened because of the strip of yarn that goes around the entire shoe. So, if they are a little big (which I’d rather have than too small!), you can snug them up a bit until they grow into them a little more.


My sister-in-law picked out the gray and white colors and I got to work. These worked up super-fast – I had them done in one evening.

Notice that you go around your first chain when making
the sole of the shoe.
I have crocheted baby shoes before, so I kinda knew what I was doing. For some reason, the first time I crocheted shoes, it was SO hard. Now, I’ve made so many of them that they are all pretty easy.


For this pattern, I used a 3.75mm hook and two different kinds of yarn – Big Twist in white for the sole and Lion brand Wool-East in oxford grey for the body. Both are worsted weight yarn.

First off, crochet the sole. You’ll notice this part is done in the round (not using slip stitches and continuing around and around the whole outside).

Finished sole.

Then, when I got to the part where you switch to the main color, I decided to add one additional row into this pattern. I like a clear edge from where the sole of the shoe ends and the body begins. There are a lot of shoe patterns out there where the sole kinda melts into the body and it ends up being very rounded. I prefer the shoes to have a flat sole. So, in-between rows 5 and 6 of this pattern, I inserted this row: After switching to the main color, slip stitch in each stitch all the way around – LOOSELY. Then, when you start row 6, you will be crocheting into only that slip stitch, not the stitch under it from the previous row. This helps create a nicer, cleaner edge between the sole and body of the shoe.

Loose slip stitches in-between rows 5 and 6.


Continue on with the pattern until the top of the shoe is done and you are ready to work on the straps and toe flaps.


After doing the strap parts, I worked on the toe flap. Those were pretty simple to do. Lining them up so they were centered, I started stitching the toe flap onto the actual shoe.

After completing that, it is time to get out your strip of yarn that you will weave through the entire shoe.


Starting the toe flap section.


As mentioned before, this is to help snug them up and keep them on. Crocheted slippers aren’t super well known for staying on all that well.

Stitching the toe flap section to the body of the shoe.


I used a yarn needle to weave the white yarn in and out of nearby stitches and all the way around the heel of the shoe back up to the front.


Go through both of the holes in the middle of the strap section and tie in a knot.


One final touch that I added to this project was a non-skid surface for the bottom. We have wooden floors and I knew if Sydney were to wear these crocheted slippers around the house, it would take about 3 seconds before she’d slip and slide and hurt herself on our wooden floors. I had heard about a product called PlastiDip and wondered if that would work for something like this.


Off to Fleet Farm I went. After searching all over in the paint section, I was not finding what I was looking for. I asked an employee for something that would help make a non-skid surface for a crochet project (I don’t recommend doing that, they look at you kinda strange), he was just as confused as I was. Finally, another guy came buy and after I explained what I was looking for, he knew right away that it was in the tool aisle.


Alas, there it was! One bottle of PlastiDip was just under $6. Not a bad price considering I only used a tiny bit of it.

I recommend spraying this in a well ventilated area – We put some paper towel on the damp grass and did it on our lawn. I used masking tape to tape off the edges where I wanted the non-skid surface to end and then taped some paper to that tape as well to protect the rest of the shoe from unwanted surfacing in case the wind took it.

After the first coat, I left the slippers in the garage to dry for about 45 minutes. Then, we did another coating and let that dry. Finally, one more coating and let it dry overnight. In the morning, I was pleasantly surprised that an initial test seemed to work – the bottom of the slippers weren’t going to slide on my wooden floor. 
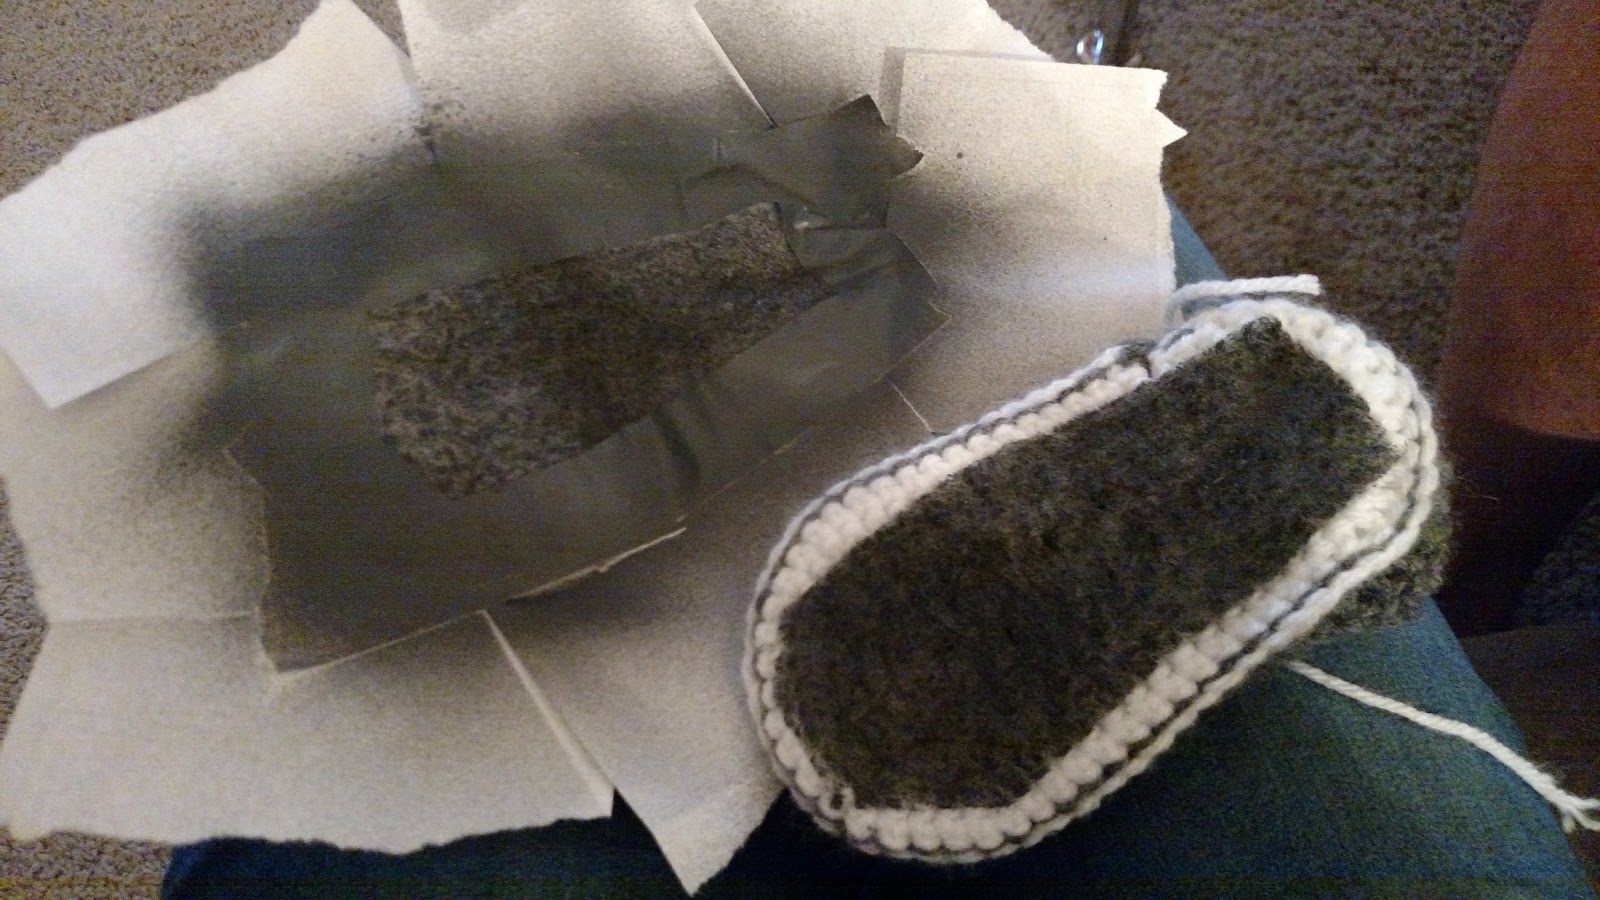
The bottom of the slipper after the PlastiDip dried.
The PlastiDip is holding up quite well after a few weeks of wear. I might reapply another coat if needed.

Isn't she adorable?!


Enjoy these super fun slippers! My niece sure does! We leave them tied so that she just has to slip them on and off. She gets super excited when she sees Uncle Jon put his shoes on. She runs over to put her slippers on to join him. :)


Tuesday, October 25, 2016

Super soft textured poof ball hat


Time to start digging out those hats, scarves, and mittens. I have had the itch to make a new hat for myself with some SUPER soft yarn. I’m talking so soft you don’t want to take it off once you are inside.

I wanted to make a hat that was interesting and had a simple, beautiful, elegant design. Along with that, I wanted a nice neutral color that would go with any coat or color of mittens.

I found the perfect pattern on Pinterest (surprise, surprise!) and set about getting the perfect yarn to go with it. Here is the free pattern link.


At first, I went with what the pattern suggested (Bernat Softee Chunky) but when I got to JoAnn fabrics and found that particular yarn, I had to strongly disagree with the name of it. It was chunky, I’ll give them that, but it was hardly soft. Like I said, I wanted super soft.


After searching the store for a yarn similar in size/texture, I found a wonderfully soft, chunky substitute. It was Deborah Norville premier yarns: Serenity Chunky weight. I picked out a neutral creamy color and grabbed two skeins.


Lucky for me, I was on my way to a conference for work and a friend was driving, so I got to crochet on the way there and back while chatting with good friends. Can life get any better than that? I submit that it cannot!!! (For those of you who are Brian Regan fans, you got that last joke, if not, you seriously need to listen to him - greatest comedian EVER!) Check out the funny joke here.


The rim of the hat took a while since there were lots of slip stitches, meaning progress was slow. I liked the ribbed look of it, though, so the patience it required was definitely worth it.


I stopped a little shy of the 21” it recommends because I was trying it on my head and felt it was the right size around 20 inches instead. I’m glad I went with that length because it fits perfectly!


In the middle of completing a back post double crochet

Now, here is where the pattern gets a little tricky. You REALLY have to pay attention to the different rounds as you go if you want the pattern to turn out right. I LOVE the simple twisting pattern this hat has, but you have to concentrate and keep track of what row you are on for it to work. To make it easier for me, I wrote out the pattern with “f” meaning front post double crochet and “b” meaning back post double crochet and then just wrote the rows out like this: 

2nd round: f,f,f,b,b
3rd round: b,f,f,f,b
4th round: b,b,f,f,f
5th round: f,b,b,f,f
6th round: f,f,b,b,f

Super squishy yarn + a fun twisting pattern = super cute hat!

Then, I just kept doing those rounds over and over until I liked the overall height of the hat. I ended up with 3 total completions of rounds 2-6.

Finish with a simple poof ball on top and wa-la, it’s complete! In case you haven't done a poof ball before, check out my previous blog post for a how-to on making a poof ball.

Isn’t it adorable? Oh, and did I mention it is ridiculously soft? I might just have to live in it.

Happy crocheting!


Thursday, October 20, 2016

Triangular scarf with fringes


I love trying out new scarf and cowl patterns – they are so fun to wear in the fall and winter!


I have been wanting to crochet a triangular shaped scarf for a while now and found a super cute pattern that only used one skein of yarn. Gotta love that! If you’re anything like me, you have SO many skeins of yarn laying around just asking to be picked up and turned into something beautiful!


I particularly liked the look of this pattern because it was so airy – lots of holes! It is so light that it doesn’t add a ton of warmth or weight, so it is perfect for a nice cool fall day.


I found the pattern on Pinterest and Ravelry. http://www.ravelry.com/patterns/library/triangle-scarf-or-shawl Although it was a little confusing to get going, once you get it figured out, it works up quickly. 


I really liked the added pictures in the pattern that helped show the beginning couple of rows – that helped me a lot!


The entire pattern is worked in triple crochet stitches. That’s what makes the nice tall stitches. The chains in-between give the spaces between the stitches, creating a nice light and airy scarf.


I used an 8mm hook and the Red Heart soft yarn in a creamy color (no dye lot or color name).


Once I was done crocheting the scarf, I had to decide if I wanted tassels on the 3 corners or fringes all the way around. 


First, I tried the tassel look but I wasn’t really in love with it. I took them off and decided to go with a fringe look instead.


To make the fringes, cut an 8 inch strip of yarn for each of your holes all the way around.

Fold the yarn in half and take the looped end and put it under the edge of one of your holes. Then, pull the two ends up and through that loop. The pictures below show the two-step process.


Center the fringe so it’s in the middle of that section of yarn and then pull tight to secure. Make sure you stay consistent with which side is facing up as you are doing the fringes – they look slightly different from side to side. 


Ta-da! Super excited for my newest scarf! It can even be used as a shawl. So, dig a skein out of your yarn stash and get going on this fun pattern - it won't take long! :)
If you liked this pattern, follow my Pinterest crochet board for more awesome patterns! https://www.pinterest.com/erinkit/crochet-ideas/

Tuesday, September 20, 2016

Crocheted poncho

My adorable niece, Sydney, showing off her poncho. :)


It’s starting to get a little chilly out. Personally, I’m not complaining. I love the crisp cool air that comes with fall. I love the turning of the leaves. I love digging out my sweaters and boots. I love hot cocoa and snuggling under blankets. Can you tell fall is my favorite season? Too bad it’s so short in North Dakota. It usually doesn’t take long before the snow starts falling.


One of the new fashion trends for this fall includes ponchos. I wanted to try my hand at crocheting one and found the cutest pattern! 


Since the pattern is a bit small for me :), I decided to make it for my adorable niece, Sydney. The pattern is for older infants and younger toddlers. I adjusted the pattern slightly to fit her perfectly. 
This is a free pattern on the Lion brand website: https://www.lionbrand.com/crochet-pattern-baby-poncho-4.html


The pattern uses Lion brand Homespun yarn. I loved the beautiful gray and white neutral color called Clouds. 

It will go with anything yet has a slight variation with the two colors blending together. The yarn is super soft and fuzzy and machine washable and dryable – a must for toddlers!


I used a 9mm crochet hook and chained the first ones loosely like it is stated in the pattern.

I got by with only one skein of yarn but didn’t have much left and I only did 11 rounds instead of the 13 that is needed for the 2-3 yr old size. 

The end of Round One.


 My niece is 20 months old so I didn't need the extra couple of rounds for the larger size. If you are doing to do the 2-3 yr size, you will probably need 2 skeins of yarn.

You can start to see the corners forming.
Love the cozy look and
feel of this yarn!


Honestly, this poncho took me two days to finish, and that’s with a lot of other things going on in my busy schedule. With a large crochet hook and lots of double crochets worked into clusters, it works up quite fast.


I was a little worried that the finished product wouldn’t fit over my niece’s head but it fit perfectly. 


Close-up of the double crochet clusters. 

In fact, if I had crocheted it any looser, it would fall off her shoulders. If I had done the smaller infant size, I think I would have crocheted the initial chain a little tighter. 

Almost done with the body part of the poncho. Now would be a good time to start trying it on to see how long you want it.
The poncho part is finished - just the neck part is left!
Finished product!


Have fun jumping in a pile of leaves and sipping your hot cocoa! Stay tuned for a matching adult sized poncho pattern!