Wednesday, August 24, 2016

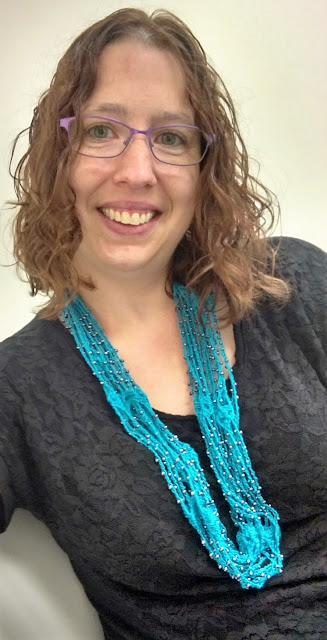
Crocheted necklace with beads

If you haven’t checked out my previous blog post with a fun free crocheted bracelet pattern, check it out here: http://erinscraftyendeavors.blogspot.com/2016/08/crocheted-bracelet.html .


I used the same beautiful turquoise thread to make this super cute beaded necklace. I have never crocheted with beads before so I was a bit intimidated.


Luckily for me, I found a super awesome blog post that had a video with a step-by-step of how to tackle this pattern. 


I like free patterns, but I like step-by-step videos even more! She does a great job explaining what to do and how to do it!


A nice pop of color with my crocheted
necklace!


My previous blog post was on a crocheted bracelet.


Materials Needed:
Some thin crochet thread (I used Aunt Lydia’s Classic 10 yarn)
3 containers of glass e-beads (I went with some pretty silvery/grey ones from JoAnn Fabrics)
Crochet hook size 3.5mm
Thin needle that will fit through the beads


The first step in this process is to put ALL of the beads onto your thread first. Trust me, it is easier this way. I started off with 2 tubes of beads (which you will see in the picture) but I ended up buying one more because I liked the look of the necklace when it was a bit thicker. It’s up to you how many overall rows/circles you want for your necklace. I ended up with 9 total and I needed 3 tubes of beads for that.


This part is a bit time consuming, but totally worth it! Pour all your beads onto a large flat surface with a slight lip to it so the beads won't roll off. This old plastic plate was perfect! Thread your thin needle with the yarn you chose and start threading your needle through each bead. 


Keep going until they are all on there! You might be tempted to only start with a few, but it is easier to have them all on your thread so you don’t have to tie off and start over by adding more beads to your thread.


Once you have all your beads on your thread, start the pattern with chaining. When you get to the first bead part, you simply pull the bead up to where you are working and chain AROUND it. 


First bead is on! The step-by-step pictures show you how to chain around the bead. 


If this part seems confusing, check out the video – it will make sense! Really, all you are doing is pulling up a bead and chaining over it as you go. Super-duper easy.


The shell part in-between each chunk of beads is a little confusing for the first row but after that, it is pretty simple. The shell stitch keeps going in the middle of the previous row’s shell stitch. Be careful not to twist the necklace as you are working on it.

See how the shell stitches continue to build on each other? Each shell stitch is put in the chain space of the previous shell.
So, you've crocheted the next block of 8 beads. Now you need to connect to the shell stitch. The crochet hook is pointing right at where you will do your next shell stitch, connecting it to the previous round. 

As you get going, you will notice that the necklace seems overly long – ridiculously long, actually. That is normal because you will end up doubling it when you are done. When I was done with 9 rows (circles), I had used up almost all of my beads and decided I was done. I tied off and weaved in loose ends. 


Then, you put it on over your head and double it up one time. I love how light the necklace is but also how simple and beautiful it is! The choices of bead and thread colors are endless! This might be my go-to Christmas present this year. :) 


Saturday, August 20, 2016

Crocheted teething biscuit


Chomp chomp. Nom nom.
 Woohoo for nephews! I love my nieces to pieces! BABIES BABIES everywhere! Can you tell I have a great love for babies? I have worked with infants for 10 years and am now working with infant and toddler caregivers. I have a passion for babies. Whenever I see a baby, I want to hold them, snuggle them, tickle them, smooch them,  play peek-a-boo with them, cuddle them, laugh with them, bounce them, play pat-a-cake with them, you get the picture.....


I love to spoil my nieces and nephews and my close friends' and relatives' babies. Anytime I hear someone is expecting, I can’t wait to find out if it’s a boy or girl so I can start crocheting something for them! I’ve been known to make blankets, diaper covers, shoes, boots, stuffed animals, hats, leg warmers, and stuffed beach balls. I love making homemade crocheted gifts for new lil ones.

             
Who can resist those flirtatious eyes and smile? :)

Because I’ve worked with many infants, I know how much the teething process SUCKS. It is so painful! I am so glad we don’t remember the process of our teeth poking through our gums for the first time! I can’t stand the pain of a canker sore, much less a tooth pushing its way through super sore, swollen gums. Anyone who has ever worked with infants (or is a parent of one) knows that when a child is teething, they want to chew on EVERYTHING. Soft squishy toys? Stuffed animals? Blocks? A friend’s elbow? Hard edge of a wooden table? Perfect!


My sweet nephew, RJ, chomping away.


When I came across this crochet pattern for teething biscuits I decided to give it a whirl. If they can help out even one baby get through the horrible process of teething, it’s worth it.


You can store these in the fridge or freezer or just run them under cool water right before giving them to the baby. They are completely washable and made of sturdy cotton thread so they won’t shred like polyester blends.


I found the pattern from this site: http://www.thelavenderchair.com/crochet-teething-biscuit-pattern/


I rewrote the pattern so I could understand it a little bit better. Here is my version: 

Teething Biscuits:
Cotton Yarn (I used Sugar ‘n Cream)
4.25 mm hook

Ch 10.
Row one: 3 hdc in 3rd chain from hook. Hdc in each stitch across until the last stitch. 6 hdc in last chain. Turn work around and work along other side. 6 hdc. 3 hdc in last stitch that already has 3 in it. Join with sl st to first stitch
Row two: Ch 2. Two dc in next 3 stitches. 6 dc along the side. Make 2 dc in next 6 stitches. Dc 6. Make 2 dc in the last 3 stitches. Sl st to first double crochet stitch.
Make 2 of these and slip stitch them together, weaving ends inside.
Put in refrigerator or rinse with cold water and offer to child. Washable. 


In the picture on the left, I have chained 10. The picture above is of 3 hdc in the 3rd chain from the hook.

This is a picture of what it should look like after you have done a row
of hdc across and 6 hdc stitches in the last stitch. As you can see, after 
putting 6 hdc stitches in the last stitch, you have turned your work around 
and are ready to work on the other side.


Slip-stitching to the first stitch, ending round one! 


End of Row two!


I crocheted two separate pieces  using the same pattern and then slip stitched them together. To do this, line them up and go through both stitches at once.


Slip stitching the two pieces together.


What the finished product looks like after the two pieces are stitched together. 


To weave in loose ends, I use my crafting needle and push the needle through a stitch near the end and push it all the way through to the middle of the teething biscuit. After pulling the needle through, cut the yarn where it comes through and wiggle the crocheted biscuit so that the loose end gets lost inside. Ta-da! You're done!


"Can I get this whole teether in my mouth? I'm not sure, but I'm gonna try!"


Thursday, August 4, 2016

Crocheted bracelet


First initial ring and the next chaining section.

Ever since I started to crochet years ago, I’ve stuck to projects that use average size crochet hooks (around 5.5mm) or larger (10mm). A friend gave me a super tiny 2mm crochet hook and I have had it for years but never used it. I decided to change that! I bought some Aunt Lydia’s cotton yarn that is super skinny and uses a 2mm crochet hook. I found a FREE super cute bracelet pattern: http://happinesscrafty.blogspot.gr/2016/04/crochet-bracelet-free-pattern.html


After buying some beautiful teal colored cotton thread from JoAnn Fabrics, I dug out my teeny tiny itty bitty 2mm hook and began to try out this pattern. Wow was it weird and HARD to do.  I felt clumsy – like I had too many fingers. I kinda felt like a giant. Not kidding.


Starting to get the hang of this pattern! :)


After I tried a couple chains and crochet stitches, I was ready to tackle the pattern. It was a little confusing at first and I had to rip it out a couple times before I got the hang of it.
After chaining 10, you always connect to the half circle that you just crocheted.
I ended up with a total of 13 half circles. You can crochet as many or as few as you like so that it will fit your wrist perfectly. 


Keep adding more semi-circles until it's the length you want! It's that simple!


After finishing the bracelet, it was time to find a button. I searched through my hundreds of buttons before I found one I really liked. It is brown and kinda rustic looking. 


I sewed it on by going through the loop in the back as well as all around the base of the button. 


Going through the button loop on the back to secure button.


Going around the button loop to secure button.


Just like that: Ta-da! Crocheted bracelet complete!


It was a little wrinkly so I decided to iron it out so it laid nicer on my wrist.
 Much better. Finished product! 


Next project – a crocheted necklace with the same cotton yarn AND tiny glass E-beads. First time I have tackled crocheting with beads! Look for that blog post down the road. :)