Showing posts with label Mother's day. Show all posts

Tuesday, January 24, 2017

Heart Valentine's Day containers

Looking for a cute, easy, fun crochet pattern for Valentine’s Day? Look no further! This little heart shaped container is a perfect gift for your loved one, your Mom or Dad, sister or brother, co-worker, child care provider, teacher, boss, neighbor, mail carrier, dentist, etc. The list goes on and on. Who wouldn’t love getting a cute little crocheted heart filled with candies, love notes or flower petals?

End of foundation round

Here is the free crocheted heart container pattern. I used an H(5mm) hook and some worsted weight yarn in red, light pink, and white. This is a great stash buster pattern! Each heart uses such a small amount of yarn that you can make one in every color! I decided to make some for my niece’s child care providers last year. I figured, after they ate the candy inside, they could use the heart container as a ring holder, put it on their nightstand to hold chapstick, or hang it up in their classroom as a fun Valentine’s Day decoration!

About half-way through Round 1.


To start the pattern, I used a magic ring. If you haven’t figured out how to do this, I advise you to take the 10 minutes. It seriously won’t take you more than that. The link to the pattern also has a great video and pictures explaining it in great detail. This simple magic circle eliminates the large hole you see after starting a project like this. A magic circle is also the perfect way to start any stuffed animals or hats.

End of Round 2


End of Round 3.
If you wanted to, you could stop the pattern anywhere along these first couple of rounds and you would have a cute heart to use as a hair clip or an accessory on a hat. Or, you could make a bunch of hearts and string them together for a garland. The possibilities are endless!

Going in to the front loop in Round 4.


I altered the pattern slightly because I wanted the bottom to be flat instead of rounded. To do that, I did Round 4 only in the front loop. That creates a nice edge between the bottom and the sides.
This is how the  bottom looks when you crochet in the front loop of Round 4.
See how it is nice and flat? :)

Crocheting Round 5


A side view of Round 5

After crocheting the hearts, I wanted to add a little something to them to really make them pop. So, I found some pretty red, white, and pink patterned fabric pieces at JoAnn’s Fabric. 


I cut the fabric into a heart shape to fit inside the container. I used some tacky glue to glue the fabric to the bottom of the crocheted heart container and  let it dry for 24 hours.


Now it’s time to fill them with goodies! You can fill them with chocolates, conversation hearts, other Valentine’s Day candy, flower petals, or whatever your heart desires!


If you are looking for another fun Valentine’s Day crochet pattern, check out my adorable heart ear warmers blog post from last year. My niece, Emily, is modeling it in this picture.


No matter how you celebrate Valentine’s Day, make sure you give your loved ones a hug and let them know you love them. Life is too short to not tell people what they mean to you! Enjoy and happy crocheting! 


Wednesday, September 28, 2016

Matching adult-sized crocheted poncho!


Have you dug out your boots and ponchos yet? If not, it’s time! As promised, here is the adult version of the crocheted poncho I made for my niece, Sydney. 


This pattern is pretty much identical to the toddler size, only bigger. :) I found the FREE pattern here: http://www.lionbrand.com/patterns/crochet-pattern-boho-poncho.html

The picture to the right is what the start of each row looks like: A chain of 4 and then 3 double crochets. When you get to the end of the row, you'll crochet 2 more double crochets in that same stitch and slip stitch it to the top of the initial chain 3.

The only thing I did differently was not include the scalloped edging. I wanted it to look exactly like the toddler version so instead of doing the fancy scalloped edging, 
I completed the poncho by chaining 1 and single crocheting around the entire thing to give it a nice finished look.


Since Steph is pretty skinny and tall, I stuck to the smaller size and only started with the chain of 44. I used the same yarn as the smaller poncho: Lion Brand Homespun in the color Clouds. It is so super soft and delightfully toasty warm. In fact, after finishing this poncho, I decided I needed one of my own. I want to use a different kind of yarn so I can play around with a different texture and color scheme, so I’ll be going shopping soon to find something fun and unique!


This poncho pattern works up so fast! I had it finished in a little over a day. And, once you get the pattern down, you really don’t have to think about it or count. I repeatedly had Steph try it on to make sure it was the correct size and to determine how long to make it.


Aren’t matching mother-daughter ponchos the best?! Too cute for words! 


Enjoy the free pattern and get busy working on your own poncho!


Sunday, May 15, 2016

Mother's Day


Last weekend, it was Mother's day! If you are looking for a cute keepsake for Mom, here is a great, easy, relatively cheap project to do. I bought a 2-pack of thick 9x12 canvases from Hobby Lobby (woo hoo for 40% off coupons!). Pick a couple of colors of acrylic paint and buy one tube of each. I picked out a bright turquoise color for the background and white for the hand and footprints.  Overall, the entire project cost less than $10 and I’ll have two super cute gifts made by Sydney to give to her Mom and Grandma. The overall idea is to paint the word “Love” on the canvas with a hand print being the letter “o” and two footprints making the letter “v.”

Canvas, foam paint brush, and two tubes of acrylic paint

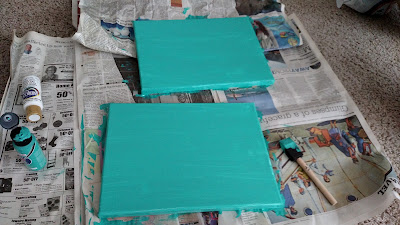
First step, prep your area with some newspapers or old magazines. I did a coat of turquoise paint on both canvases, including the sides. The first coat ends up being a little streaky looking, but that’s OK because you’ll go over it again with a second coat and that will even things out.


Give it an hour or so to dry completely and then give it another coat of paint. Keep in mind this is acrylic paint and is PERMANENT. Make sure you wash your hands right away afterwards with soap and water to remove any paint from your hands. Wear old clothes so you don’t have to worry about staining anything.


After the first coat of paint


The next step is a little tricky. You’ll need at least two people to tackle this job. I recruited Sydney’s super awesome child care providers. I also brought an old washrag to wash Sydney’s hands and feet.

With the white paint and a small paintbrush, paint one of the child’s hands and carefully make a hand print where the “o” in the word “Love” will be on your canvas. If you are making multiples canvases (like I am), do the other hand print right away since you already have the child’s hand messy! You will have to add more paint before doing the second print. Have one person hold onto the child’s wrist to prevent any hand flailing and paint flying. Hopefully, you’ll get a nice spread out hand print with the fingers clearly visible. Some younger children might have more of a blob looking print because they like to put their fingers into little fists.

After washing up the child’s hand, then it’s time to tackle the feet. Take off socks and shoes, roll up the child’s pants (or take them off completely) and have one person hold the child’s ankle still while the other person gently paints the child’s foot with white paint. Both teachers can help lift up the child and place the child’s footprint on the canvas. Then, do the other footprint to complete the letter “v.”

Painting the "L" and "e" on after the prints dried

Let both of these completely dry before tackling the “L” and “e.” I like to wait to do those two letters last in case the hand or footprints go crazy and end up not quite where you want them. With a thin brush, paint the “L” and “e” onto the canvas and let dry. You’re done! If you’d like, you can put the child’s name and year on the front (but at the very least, put it on the back) so you can remember when your child’s hand and feet were that small. 

Finished product!