Showing posts with label free crochet pattern. Show all posts

Sunday, May 7, 2017

Free crocheted baby Groot pattern


So, how many of you are Guardians of the Galaxy fans? Ready for the new movie to come out? I know I am! One of my FAVORITE characters in the movie was Groot. How can you not fall in love with Groot? He’s sooooo adorable.  A good friend of mine, Lindzee, was a bit obsessed with Groot. I decided to crochet her a baby Groot, complete with the little pot he lives in. I found a fabulous free Groot crochet pattern HERE.

Materials needed:
Brown I Love This Yarn from Hobby Lobby
Light green yarn I Love This Yarn from Hobby Lobby

5 mm  and 3.75 (or 4)mm crochet hook
Small amount of stuffing
Two pipe cleaners

Scraps of black yarn
2 small black buttons for eyes
Scissors
Yarn needle
Small ceramic/clay pot

Glass stones to fill the bottom of the pot
Fake moss/grass to cover the stones


Using I Love this Yarn from Hobby Lobby in brown, I got to work. The pattern is pretty easy to understand. It didn't take long to finish the body, head, and arms. I attached his eyes, stitched on a smile and put him in his little clay pot. I put some glass beads in the bottom to hold him in place and covered them with some fake green grass/moss that I found at Hobby Lobby. Isn’t he so cute!? Can't wait to go see the movie!


Monday, February 27, 2017

Waffle weave mug cozie crochet pattern

Another one of the fabulous child care center directors I am working with just finished her Aim4Excellence credential not too long ago. You know what that means, don’t you? Time for me to crochet something as a little “congrats!” gift! 


I knew the director enjoyed coffee/tea/hot cocoa so I wanted to get her a gift card to Caribou Coffee. I have made a handful of different coffee mug cozies in the past, but I came across a pattern that used the waffle weave stitch that I had used in a baby blanket years ago. 


I LOVE that a simple front post double crochet and back post double crochet stitch can create such a unique, textured look. 


Materials used: 
A small amount of worsted weight yarn (I chose a pretty teal color)
Size H hook (5 mm)
Large button
Thread, scissors, needle

I found the free waffle weave crocheted cozie pattern here.

The pattern calls for a 4.5mm hook, which I didn’t have. I used a 5mm hook and it worked out just fine! Mine fits the small size Caribou coffee cup just perfectly!


End of Round 1.


A few stitches into Round 3. Notice how the the texture is starting to
appear already. 


A few stitches into Round 4.
A little over half way done. You can see how the alternating front and back post double crochet stitches make this unique waffle weave look. 
Finished product!

After crocheting the cozie, I found a nice large wooden button and sewed it on with turquoise thread. I put it on the Caribou Coffee cup, filled the cup with some candies and the gift card, and “Wa-la!” The director loved her little gift! :) P.S. If you ask the coffee shop barista reaaalllly nicely, they might just give you an extra cup for free - they did for me! 


Yummmmy. Chocolate and a coffee gift card. What's not to love!?

If you like the look of this waffle weave stitch, you should check out the baby blanket I made using the same type of pattern – it is simple and beautiful! 


Baby blanket using the waffle weave crochet stitch.
                               

Friday, February 3, 2017

Square hat with two pompoms

Awwwwww. Seriously, that's the only word for this picture.

Have I ever mentioned that I LOVE making baby gifts? I know SO many people expecting babies right now! As soon as I hear about someone expecting a baby, I immediately ask if they are going to find out the sex of the baby. It’s always easier to make something if you know if it’s a boy or girl. One of the child care centers I am working with has FOUR women expecting. Woo! Don’t be drinking that water unless you want a little one of your own. ;) 

One of the gals, Miranda, had her sweet baby boy, Creed, just about a month ago. I decided to make this adorable double pom pom hat for her lil guy using a nice, soft, thick and colorful yarn. I found the free double pom pom hat pattern here.

Starting the foundation single crochet

For this pattern, I used the following:
10 mm crochet hook
1 ½ skeins of Loops & Threads Charisma in Sunny Day
My homemade pom pom maker (click here for how to make a poof ball)

This pattern starts on the bottom rim of the hat and works its way up.  To make the rim a little bit more stretchy and flexible, I tried out a foundation single crochet stitch.


I have never done that before so I had to look up a Youtube video to see how it was done. Not really all that hard to learn and the result was wonderful! I will be starting more patterns with this technique!

After a row of front and back post double crochets. See that nice texture starting to pop out?

The first couple rows are front and back post double crochet to create a neat looking texture on the rim of the hat. The rest of the pattern is simply double crochet stitches. I made my hat a little bit bigger because I expect the lil guy to grow into it and didn’t want it to be too small right away.

Pom poms are attached. Now time to trim them!

I added a few more inches on the top before finishing off so that the rim can be rolled up. That way, the baby can grow into the hat a little bit more. After finishing the hat, I made two pom poms to attach to the top two corners of the hat.


Finished product with the trim of the hat unrolled

The trim of the hat rolled up to fit a smaller baby.

Absolutely precious baby Creed snoozing away in his new hat!
Professional pictures were done by Expressions by Ashton Photography. She has a location in Fargo and Bismarck, ND. Here is their website for more info: http://expressionsbyashton.com/

Tuesday, January 24, 2017

Heart Valentine's Day containers

Looking for a cute, easy, fun crochet pattern for Valentine’s Day? Look no further! This little heart shaped container is a perfect gift for your loved one, your Mom or Dad, sister or brother, co-worker, child care provider, teacher, boss, neighbor, mail carrier, dentist, etc. The list goes on and on. Who wouldn’t love getting a cute little crocheted heart filled with candies, love notes or flower petals?

End of foundation round

Here is the free crocheted heart container pattern. I used an H(5mm) hook and some worsted weight yarn in red, light pink, and white. This is a great stash buster pattern! Each heart uses such a small amount of yarn that you can make one in every color! I decided to make some for my niece’s child care providers last year. I figured, after they ate the candy inside, they could use the heart container as a ring holder, put it on their nightstand to hold chapstick, or hang it up in their classroom as a fun Valentine’s Day decoration!

About half-way through Round 1.


To start the pattern, I used a magic ring. If you haven’t figured out how to do this, I advise you to take the 10 minutes. It seriously won’t take you more than that. The link to the pattern also has a great video and pictures explaining it in great detail. This simple magic circle eliminates the large hole you see after starting a project like this. A magic circle is also the perfect way to start any stuffed animals or hats.

End of Round 2


End of Round 3.
If you wanted to, you could stop the pattern anywhere along these first couple of rounds and you would have a cute heart to use as a hair clip or an accessory on a hat. Or, you could make a bunch of hearts and string them together for a garland. The possibilities are endless!

Going in to the front loop in Round 4.


I altered the pattern slightly because I wanted the bottom to be flat instead of rounded. To do that, I did Round 4 only in the front loop. That creates a nice edge between the bottom and the sides.
This is how the  bottom looks when you crochet in the front loop of Round 4.
See how it is nice and flat? :)

Crocheting Round 5


A side view of Round 5

After crocheting the hearts, I wanted to add a little something to them to really make them pop. So, I found some pretty red, white, and pink patterned fabric pieces at JoAnn’s Fabric. 


I cut the fabric into a heart shape to fit inside the container. I used some tacky glue to glue the fabric to the bottom of the crocheted heart container and  let it dry for 24 hours.


Now it’s time to fill them with goodies! You can fill them with chocolates, conversation hearts, other Valentine’s Day candy, flower petals, or whatever your heart desires!


If you are looking for another fun Valentine’s Day crochet pattern, check out my adorable heart ear warmers blog post from last year. My niece, Emily, is modeling it in this picture.


No matter how you celebrate Valentine’s Day, make sure you give your loved ones a hug and let them know you love them. Life is too short to not tell people what they mean to you! Enjoy and happy crocheting! 


Monday, January 16, 2017

Crocheted popcorn garland


I love being crafty and I love making things for other people. I especially love getting commissioned to make something special for someone! 


So, you can imagine my excitement when my good friend Jackie contacted me to make some popcorn garlands for her and her Mom.


I found a couple of different patterns and showed them to Jackie. Her Mom really liked one of them. I found the free pattern on Ravelry. I used a 3.5mm hook and I Love this Yarn sport weight in white from Hobby Lobby. 


This particular pattern makes a long strand of connected popcorn pieces. It uses a cluster stitch where the last loop of 4 treble crochets are left on the hook and then you yarn over and go through all 5 loops on the hook at once (pictured above). 


I made a total of 4 strands, each between 6 and 8 feet long. It was a relaxing easy pattern once I got the hang of the treble cluster stitch. A bit time consuming, but when you are sitting in front of the TV, at least you feel like you get something accomplished! :)


Don't those popcorn garland strands look so nice next to the beautiful ornaments!?


After I made the popcorn strands for Jackie's Mom, Jackie found another super cute popcorn pattern! The one she found makes individual popcorn pieces and then you string them together with whatever yarn/wire/twine you want! They turned out SUPER DUPER cute! I'll be posting that pattern soon!

Simply beautiful!

The four strands of popcorn garland ready to ship! 


Thanks, Jackie, for commissioning me to make some fun, beautiful, and simple popcorn garlands to add to your Mom's tree! I'll be doing a post soon on the cute popcorn pieces I made for your tree! I can't decide which one I like more - they are both so fun!

A few years ago, I made Jackie a beautiful waffle weave blanket for her sweet baby boy, Emmett. Here is a link to the waffle weave blanket pattern.

Monday, November 21, 2016

Crocheted snowflake and star ornaments

I love my job! I get the privilege of working with child care providers and directors in the eastern part of North Dakota. I love that we share a similar passion – to provide the best quality care we can for our future generation. Through the past year and a half, I have been working with a handful of directors who are working hard on a director’s credential called Aim4Excellence. It is intense. It is time consuming. It is in-depth. Each module takes about 6 weeks and there are 9 modules. That’s a lot of hours. Recently, a few of the directors I’ve been working with have finished this daunting task. The last time I met with them, I wanted to give them a little something to thank them for all the hard work they have put in. I’m pretty sure you can guess that it was homemade. After all, I do like being crafty. ;) Since Christmas is around the corner (yippeeee!), I decided to find some cute crocheted Christmas decoration patterns and try my hand at making them.

The first one I found was for snowflakes. The free crochet pattern can be found here. I used a G sized crochet hook and a couple of different colors of worsted weight yarn. Loops & Threads Impeccable yarn in Teal, I Love this Yarn in graphite and I Love this Yarn in white sparkle. The white sparkle yarn is absolutely perfect for this pattern! Just enough sparkle to look like a snowflake. :)

The beginning of the pattern starts with a magic ring.


Then, I dug out my sparkly Modge Podge (seriously, this is so cool!) and dabbed a bit on the front of the snowflakes. Not only does it add a nice fun sparkle, it stiffens the yarn so that the snowflake doesn’t curl in on itself. Multi-purpose AND pretty – can’t get better than that! Don't forget to continually tighten your magic circle so that the hole in the middle stays small. It will want to stretch as you go.


When you are putting the Modge Podge on, it will look really white. Be patient, once it dries, it will be clear and only show the sparkles. Don't put it on too 
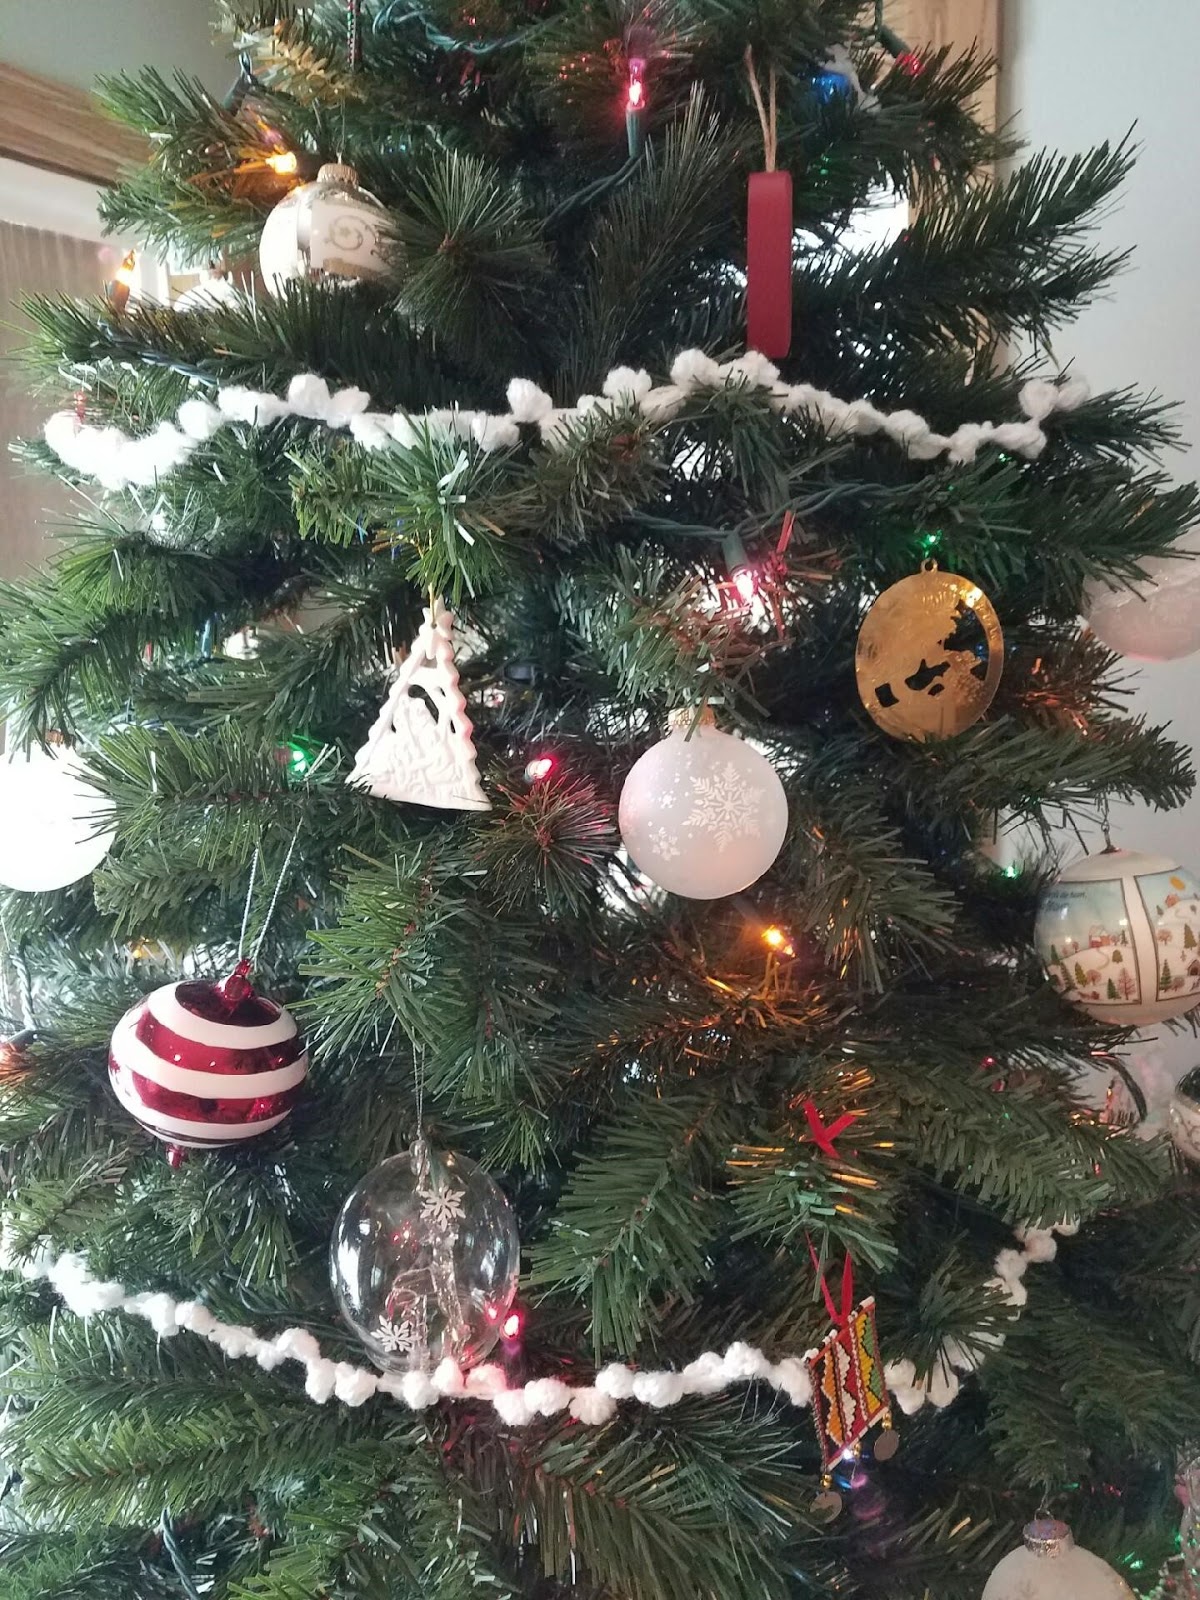
thick because the sparkles kinda clump together. After drying, I tied the snowflakes together to make a long garland.


I spaced the snowflakes about 3 inches apart using my husband's old-school Transformers ruler. :)


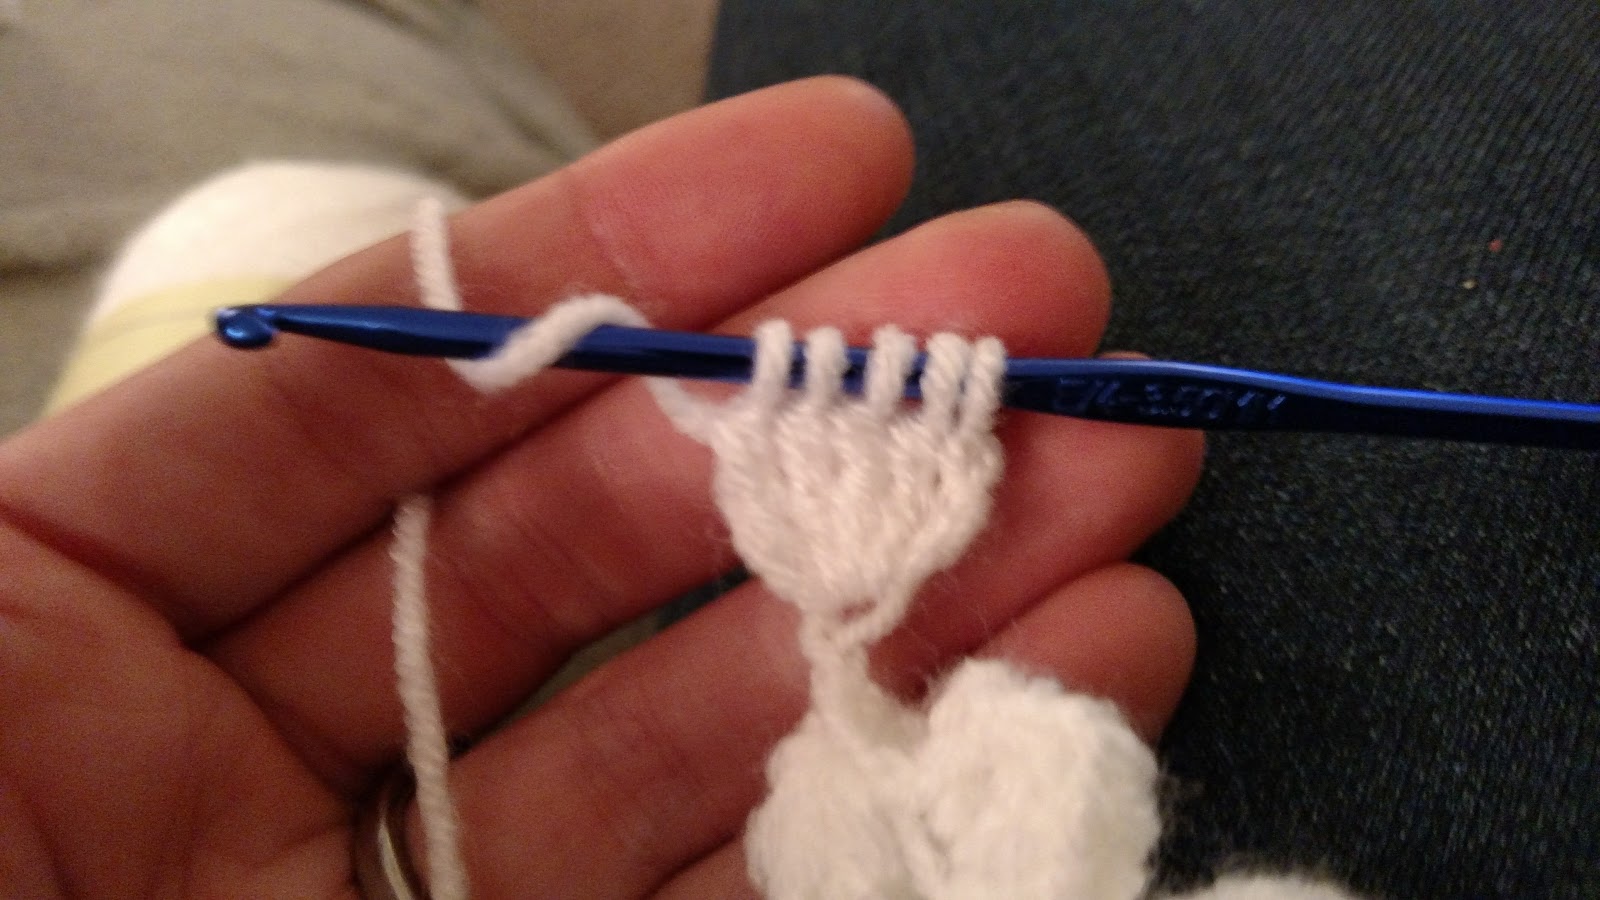
The next project I took on was crocheted stars. I found this free pattern on Pinterest. I used a G sized crochet hook and used three different festive colors. I Love this Yarn in sparkle white, I Love this Yarn in Jelly Bean, and Yarn Bee Dreamy Chenille in black cherry.  

I started the yarn with a magic circle for all of the colors EXCEPT for the red. That yarn tends to break when I try to tighten the magic circle. I stuck with a simple chain 4 and slip stitched into the first chain to form a circle. Then, I put the puff stitches in that. 


The beginning of this pattern using a magic circle
Starting Round 2 of the pattern


Once again, I used the sparkly Modge Podge to stiffen the yarn and add that nice little sparkle. These turned out so cute! I decided to turn these into tree decorating ornaments so I put a little bit of red yarn at the top and created a loop so it could hang. 


Starting Round 3 of the pattern


Finished pile of stars! Now comes the sparkly part!

                                                                                                                                                               
My husband graciously offered to burn the ends of the yarn so it wouldn’t unravel. Any time my husband can play with fire, he’s a happy man. Is that a Y chromosome thing? 


I found a cute cardboard container in the dollar section at Target and managed to find some matching tissue paper in my tissue paper storage container. Win win! Relatively cheap gift and I was able to use up some scraps of yarn that had been in my stash for quite a while.


If you are looking for an easy Christmas crochet pattern to use up yarn and to make a cute creative gift for someone in your life, look no further!